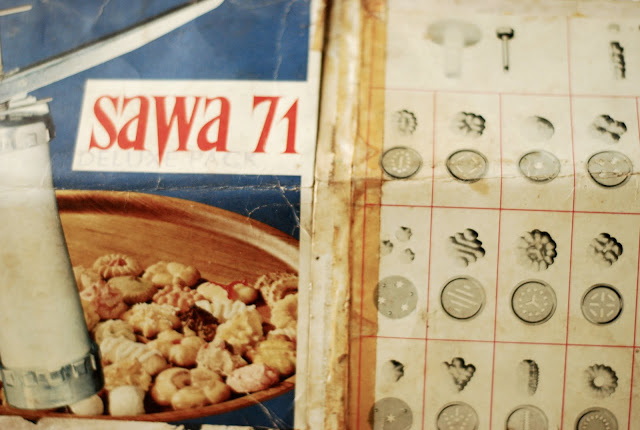
I was about to end my love affair with cookies when I came across my mother's cookie kit which I stowed away in a trunk I have of "precious hand-me-downs" from my father, mother and grandmother. The trunk is truly a treasure trove as it has, among other things, my mother's old gold wedding sari (from 1964), my dad's model trains (he was obsessed with his train sets) and my grandmother's beautiful crocheted table linen. I decided to clean out the trunk (actually I wanted to see if there was any 'vintage' clothing I could salvage — I've been feeling the vintage vibe lately) and I came across an old, almost rusty biscuit tin tucked in a corner.
Ooooh. I was excited wondering what it could be. I squealed as soon as I opened the tin and spied the gold gleaming from underneath the lid.
Not a necklace. Not a gold bar. It was my mum's old cookie press which I am quite sure is at least 40 years old. AMAZING. Why hadn't I looked for it earlier. I remember as a child of seven or eight, I'd watch as my mum made cookies using her press for our teatime treats. I used to badger her to let me try my hand at the press but she always kindly refused, allowing me to help fill it with the cookie dough instead.
Wow. This find was huge.
I abandoned my search for vintage wear, packed up the trunk and ran downstairs with the tin. My dog Mojo looked up, irritated at the noise I was making while he was trying to nap, I presume.
I told him of my plan to bake some more cookies and he seemed satisfied and went back to sleep.
I carefully took the cookie press — the brand was Sawa Deluxe 71 — out of the tin and inspected the condition of the gadget. It hadn't been used for at least ten years, I am sure and I hoped it was still functional.
Turns out, it was more than just functional. It was in mint condition. Old is gold.
The cookie press comes in four parts: a gold metal tube that holds the dough; a screw-on ring to hold the shape-discs, the plunger and lever that push the dough out through the discs. The tube still gleamed, the discs (that come in various cut-out patterns to determine the shape of the cookies) were also perfect. I tried the lever on top that pressed the dough out through the discs and it was good to go too. Fantastic. All it needed was a good wash.
I settled on a recipe for Cream Cheese Cookies mostly because I had about 100g of cream cheese that had been sitting in my chiller for about a month.
Using the cookie press proved to be a challenge for me ... in the beginning. The problem was my dough: it was a little too soft. After I added a couple of tablespoons of flour though, it became firmer and the problem was solved.
I also had to get into the grove of using the press. There was a "switch" just beneath the lever that could adjust the thickness of the dough that comes out. My first few attempts yielded really skinny and thin cookies. I was so frustrated. Then I decided to do some research (as the manual for the press was missing) and I went online to look for a solution which is when I discovered the "switch".
Once that was settled, I was unstoppable. So excited was I that I took out my sugar sprinkles and went crazy on my cookies.
The Cream Cheese Cookies were tasty. It is a soft cookie, so don't hope for a crunch.
Cream Cheese Cookies
225g unsalted butter, softened
100g cream cheese
1 cup Castor sugar
1 tsp vanilla extract
1 egg yolk
1 tsp lemon zest
21/2 cup all purpose flour, sifted
1/2 tsp salt
Preheat the oven to 180C. Cream the butter and cream cheese in the electric mixer (paddle attachment) until soft. Add the sugar and mix till light and fluffy. Add the vanilla extract and egg yolk and mix till well incorporated. Add the zest and a couple of seconds later, the sifted flour and salt. Mix on low speed till evenly combined. The dough should resemble play-dough. If it's too soft, add a couple of tablespoons flour into the dough by hand.
Get the cookie press ready.
Screw on the rod/lever to the tube.
Take a portion of the dough and roughly shape it into a log and fit it into the tube from the bottom of the tube.
Choose a disc with a cut out pattern that you like and then place it on the bottom ring. Screw the ring on to the bottom of the tube.
Place the cookie press down on a flat surface and pump the lever a few times to push the dough to the bottom of the press. You should hear a loud clicking sound as so do this. You should be able to feel when the rod touches the dough indicating that the dough has reached the bottom and is ready to be pressed.
Have a trial run. Keeping the press flat on a baking tray (ungreased). Push the lever down once to push the dough through the disc. Lift the press straight up and you will be able to see the shaped cookie on the tray. Leave a 2cm gap between each cookie and repeat.
Bake the cookies for about 10 mins. You can decorate them with sprinkles or chopped cherries before you bake them or leave them plain.


No comments:
Post a Comment